displaying: https://concernrecipes.blogspot.com/atom.xmlMagpieRSS Object
(
[parser] => 0
[current_item] => Array
(
)
[items] => Array
(
[0] => Array
(
[id] => tag:blogger.com,1999:blog-1629366684026287385.post-4802730177833727717
[published] => 2021-08-10T22:10:00.004+07:00
[updated] => 2021-08-10T22:10:37.663+07:00
[title] => Scandinavian Christmas Spice Cookies ( Peppernotter )
[atom_content] => Ingredients:
3 eggs
� cup white sugar
� cup brown sugar
2 teaspoons lemon juice
? cup finely chopped almonds (Optional)
1 teaspoon baking powder
1 teaspoon ground cinnamon
1 teaspoon ground ginger
1 teaspoon ground black pepper
� teaspoon ground allspice
� teaspoon ground cloves
3 cups all-purpose flour
1 cup confectioners? sugar
2 teaspoons water
Directions:
Preheat oven to 300 degrees F (150 degrees C). Grease several baking sheets.
Beat the eggs, white sugar, and brown sugar in a bowl until the sugar has dissolved, then beat in lemon juice, almonds, baking powder, cinnamon, ginger, black pepper, allspice, and cloves until thoroughly combined. Mix in flour to make a sticky dough.
Turn the dough out onto a well-floured work surface, and knead the dough 1 to 2 minutes, adding more flour if needed, to make a smooth, workable dough. Pinch off pieces of dough and roll them into balls about 1 1/2 inches in diameter, and place the balls on the prepared baking sheets at least 1 inch apart.
Bake in the preheated oven until a toothpick inserted into the center of a cookie comes out clean, about 25 minutes. Remove from sheets immediately to cooling racks to prevent cookies from getting too hard.
Stir together confectioners? sugar and water to make a glaze, and drizzle each cookie while slightly warm with about 1/2 teaspoon, spreading it around the top of the cookie.
[link_replies] => https://concernrecipes.blogspot.com/feeds/4802730177833727717/comments/defaulthttps://concernrecipes.blogspot.com/2021/08/scandinavian-christmas-spice-cookies.html#comment-form
[link_edit] => https://www.blogger.com/feeds/1629366684026287385/posts/default/4802730177833727717
[link_self] => https://www.blogger.com/feeds/1629366684026287385/posts/default/4802730177833727717
[link] => https://concernrecipes.blogspot.com/2021/08/scandinavian-christmas-spice-cookies.html
[author_name] => Unknown
[author_email] => noreply@blogger.com
[thr] => Array
(
[total] => 0
)
)
[1] => Array
(
[id] => tag:blogger.com,1999:blog-1629366684026287385.post-3742949764864668658
[published] => 2021-08-10T19:12:00.004+07:00
[updated] => 2021-08-10T19:12:53.506+07:00
[title] => Keto No-Sugar Cheesecake ? Low Carb
[atom_content] => Ingredients:
1/2 c. almond flour
1/2 c. coconut flour
1/4 c. shredded coconut
1/2 c. (1 stick) butter, melted
3 (8-oz.) blocks cream cheese, softened to room temperature
16 oz. sour cream, at room temperature
1 tbsp. stevia
2 tsp. pure vanilla extract
3 large eggs, at room temperature
Sliced strawberries, for serving
Directions:
Preheat oven to 300�. Make the crust: Grease an 8? or 9? springform pan, and cover the bottom and edges with foil. In a medium bowl, mix together the flours, coconut, and butter. Press the crust into the bottom and a little up the sides of the prepared pan. Place the pan in the fridge while you make the filling.
Make the filling: In a large bowl, beat the cream cheese and sour cream together, then beat in the stevia and vanilla. Add the eggs one at a time, mixing after each addition. Spread the filling evenly over the crust.
Place cheesecake in a deep roasting pan and set on middle rack of oven. Carefully pour enough boiling water into roasting pan to come halfway up sides of springform pan. Bake for 1 hour to 1 hour 20 minutes, until it only slightly jiggles in the center. Turn oven off, but leave the cake in the oven with the door slightly ajar to cool slowly for an hour.
Remove pan from water bath and take off foil, then let chill in the fridge for at least five hours or overnight. Slice and garnish with strawberries.
[link_replies] => https://concernrecipes.blogspot.com/feeds/3742949764864668658/comments/defaulthttps://concernrecipes.blogspot.com/2021/08/keto-no-sugar-cheesecake-low-carb.html#comment-form
[link_edit] => https://www.blogger.com/feeds/1629366684026287385/posts/default/3742949764864668658
[link_self] => https://www.blogger.com/feeds/1629366684026287385/posts/default/3742949764864668658
[link] => https://concernrecipes.blogspot.com/2021/08/keto-no-sugar-cheesecake-low-carb.html
[author_name] => Unknown
[author_email] => noreply@blogger.com
[thr] => Array
(
[total] => 0
)
)
[2] => Array
(
[id] => tag:blogger.com,1999:blog-1629366684026287385.post-2316560318342233086
[published] => 2021-08-10T18:29:00.001+07:00
[updated] => 2021-08-10T18:29:48.591+07:00
[title] => Best Ever Keto Chocolate Chip Cookies
[atom_content] =>
Ingredients:
2 large eggs
1/2 c. (1 stick) melted butter
2 tbsp. heavy cream
2 tsp. pure vanilla extract
2 3/4 c. almond flour
1/4 tsp. kosher salt
1/4 c. keto-friendly granulated sugar (such as Swerve)
3/4 c. dark chocolate chips (such as Lily?s)
Cooking spray
Directions:
Preheat the oven to 350�. In a large bowl, whisk the egg with the butter, heavy cream, and vanilla. Stir in the almond flour, salt, and Swerve.
Fold the chocolate chips into the cookie batter. Form the batter into 1? balls and arrange 3? apart on parchment lined baking sheets. Flatten the balls with the bottom of a glass that has been lightly greased with cooking spray.
Bake until the cookies are lightly golden, about 17 to 19 minutes.
[link_replies] => https://concernrecipes.blogspot.com/feeds/2316560318342233086/comments/defaulthttps://concernrecipes.blogspot.com/2021/08/best-ever-keto-chocolate-chip-cookies.html#comment-form
[link_edit] => https://www.blogger.com/feeds/1629366684026287385/posts/default/2316560318342233086
[link_self] => https://www.blogger.com/feeds/1629366684026287385/posts/default/2316560318342233086
[link] => https://concernrecipes.blogspot.com/2021/08/best-ever-keto-chocolate-chip-cookies.html
[author_name] => Unknown
[author_email] => noreply@blogger.com
[thr] => Array
(
[total] => 0
)
)
[3] => Array
(
[id] => tag:blogger.com,1999:blog-1629366684026287385.post-7494437579254142291
[published] => 2021-07-15T15:24:00.002+07:00
[updated] => 2021-07-15T15:24:16.801+07:00
[title] => Old Fashioned Butter Cake
[atom_content] => This Old Fashioned Butter Cake is a classic and always a favorite.
Ingredients
- 2 cups all-purpose flour, sifted
- 1 1/4 cup sugar
- 1 tablespoon baking powder
- 1 teaspoon salt
- 1/2 cup butter, softened
- 1 cup milk
- 1 teaspoon vanilla extract
- 2 eggs
Preparation
Preheat oven to 350?F. Grease and flour two 8 inch x 2 inch baking pans and set aside.
In a large mixing bowl sift together the flour, sugar, baking powder and salt.
Add butter, milk, and vanilla. With a hand mixer, beat for 2 minutes, occasionally scraping down the sides of the bowl.
Add eggs and beat for 2 minutes more.
Pour batter into prepared pans, dividing equally between the pans. Bake 30 to 35 minutes, or until a toothpick inserted into the center comes out clean. Remove from oven.
Cool in the pans for 10 minutes and then turn cakes out onto a cooling rack to cool completely.
Add your favorite frosting to the cake.


[link_replies] => https://concernrecipes.blogspot.com/feeds/7494437579254142291/comments/defaulthttps://concernrecipes.blogspot.com/2021/07/old-fashioned-butter-cake.html#comment-form
[link_edit] => https://www.blogger.com/feeds/1629366684026287385/posts/default/7494437579254142291
[link_self] => https://www.blogger.com/feeds/1629366684026287385/posts/default/7494437579254142291
[link] => https://concernrecipes.blogspot.com/2021/07/old-fashioned-butter-cake.html
[author_name] => Unknown
[author_email] => noreply@blogger.com
[thr] => Array
(
[total] => 0
)
)
[4] => Array
(
[id] => tag:blogger.com,1999:blog-1629366684026287385.post-3484325455047582723
[published] => 2021-07-14T13:50:00.002+07:00
[updated] => 2021-07-14T13:50:53.790+07:00
[title] => Delightful Date Nut Bars
[atom_content] => Dates and nuts, the star ingredients in Delightful Date Nut Bars, are both delicious superfoods containing essential nutrients. These plant-based bars are nutritionally dense. The dates and nuts together provide the natural sweetness and protein that makes these bars sinfully delicious and healthy. Because they are so dense and nutrient packed, one 1? x 2? bar will go a long way to filling you up. They also providing long-lasting energy to get you through the morning.
Ingredients
- 3 cups chopped dates
- 2 cups lemonade or fruit juice (water with a splash of lemon can also be used)
- � cup sugar (optional, depending on sweetness level desired and type of juice used)
- Dash salt
- 1 cup nuts (any kind, walnuts and chopped almonds work well)
- 2 cups flour (regular or half whole wheat)
- 2 cups oatmeal (regular or quick cooking, not steel-cut oats)
- � cup brown sugar
- 1 cup butter
Instructions
- Cook dates, lemonade, sugar and salt over high heat to boil, reduce heat, simmer 5 minutes or until thick. Stir in nuts.
- Grease and flour 9 x 13 pan. Mix together flour, oats and brown sugar, cut in butter.
- Pat 2/3 of oat mixture into bottom of pan. Spread date mixture over layer of oat mixture. Sprinkle rest of oat mixture over dates.
- Bake at 375 for 30 minutes or until lightly browned.
- Let sit in pan for 5-10 minutes before cutting. Store in air tight container in refrigerator.
- This recipe makes a lot of bars, you might want to freeze half for later use. The best way to freeze them, and to prevent freezer burn, is to wrap tightly in plastic wrap first them wrap in a layer of foil.
[link_replies] => https://concernrecipes.blogspot.com/feeds/3484325455047582723/comments/defaulthttps://concernrecipes.blogspot.com/2021/07/delightful-date-nut-bars.html#comment-form
[link_edit] => https://www.blogger.com/feeds/1629366684026287385/posts/default/3484325455047582723
[link_self] => https://www.blogger.com/feeds/1629366684026287385/posts/default/3484325455047582723
[link] => https://concernrecipes.blogspot.com/2021/07/delightful-date-nut-bars.html
[author_name] => Unknown
[author_email] => noreply@blogger.com
[thr] => Array
(
[total] => 0
)
)
[5] => Array
(
[id] => tag:blogger.com,1999:blog-1629366684026287385.post-3930330436086604293
[published] => 2021-07-14T13:00:00.002+07:00
[updated] => 2021-07-14T13:00:28.906+07:00
[title] => White Chocolate & Berry Brownies
[atom_content] => Made with white chocolate and topped with mixed berries, make these brownies for someone berry special.
Ingredients
White Chocolate and Red Berries Brownies
- 3/4 cup butter, cubed
- 2 1/4 cups sugar
- 4 eggs, beaten
- 10 1/2 ounces white chocolate, melted
- 2 cups flour
Berry Sauce
- 3 1/2 ounces mixed berries
- 4 teaspoons sugar
Steps
White Chocolate and Red Berries Brownies
- Preheat oven to 350 degrees. Grease and flour a square baking pan.
- In a mixing bowl, using a hand mixer, combine the butter and sugar. Mix in the beaten eggs, followed by the chocolate. Stir in the flour.
- Pour mixture into the prepared pan.
- Pour the berry sauce on top, and use a toothpick to swirl sauce through the batter.
- Bake for 20 minutes. Allow to cool, and cut into squares.
Berry Sauce
- In a saucepan over medium heat, add the berries and sugar. Cook until a sauce forms then set aside.
[link_replies] => https://concernrecipes.blogspot.com/feeds/3930330436086604293/comments/defaulthttps://concernrecipes.blogspot.com/2021/07/white-chocolate-berry-brownies.html#comment-form
[link_edit] => https://www.blogger.com/feeds/1629366684026287385/posts/default/3930330436086604293
[link_self] => https://www.blogger.com/feeds/1629366684026287385/posts/default/3930330436086604293
[link] => https://concernrecipes.blogspot.com/2021/07/white-chocolate-berry-brownies.html
[author_name] => Unknown
[author_email] => noreply@blogger.com
[thr] => Array
(
[total] => 0
)
)
[6] => Array
(
[id] => tag:blogger.com,1999:blog-1629366684026287385.post-22872316923099887
[published] => 2021-06-12T18:03:00.001+07:00
[updated] => 2021-06-12T18:03:20.434+07:00
[title] => Chocolate Chip Toffee Fudge Cookie Bars
[atom_content] => Chocolate Chip Cookie Bars with a graham cracker crust and a layer of toffee fudge! You?ll love the chewy chocolate chip cookie texture paired with the layers of crust and fudge for an ultimate dessert recipe.
Ingredients
For the Crust:
-
2 cups graham cracker crumbs
-
� cup unsalted butter, melted
For the Fudge Layer:
-
14 oz can sweetened condensed milk
-
12 oz semi sweet chocolate morsels
-
1 Tablespoon unsalted butter
-
� cup Heath toffee bits
For the Cookie Layer:
-
� cup butter flavored Crisco
-
2 Tablespoons milk
-
1 Tablespoon pure vanilla extract
-
1 � cup light brown sugar, packed
-
1 large egg
-
1 � cup all-purpose flour
-
1 teaspoon kosher salt
-
1 teaspoon baking soda
-
� teaspoon ground cinnamon
-
12 oz milk chocolate morsels
-
� cup Heath toffee bits
Instructions
- In a small bowl mix melted butter with
graham cracker crumbs. Press firmly into bottom of a parchment paper
lined 13�9 baking pan.
- In a small
saucepan, mix condensed milk with semi sweet morsels and butter. Heat
over medium heat until smooth. Pour over crust. Sprinkle with � cup
toffee bits.
- In large mixing bowl, beat
Crisco with brown sugar, milk and vanilla until smooth. Beat in egg. Add
flour, salt, baking soda and cinnamon. Fold in milk chocolate morsels.
Spread over fudge layer. Sprinkle with remaining toffee bits.
- Bake
in a 350 degree oven for about 30-35 minutes. Cookie dough may appear
slightly under cooked. Allow to cool completely. Slice and enjoy!
[link_replies] => https://concernrecipes.blogspot.com/feeds/22872316923099887/comments/defaulthttps://concernrecipes.blogspot.com/2021/06/chocolate-chip-toffee-fudge-cookie-bars.html#comment-form
[link_edit] => https://www.blogger.com/feeds/1629366684026287385/posts/default/22872316923099887
[link_self] => https://www.blogger.com/feeds/1629366684026287385/posts/default/22872316923099887
[link] => https://concernrecipes.blogspot.com/2021/06/chocolate-chip-toffee-fudge-cookie-bars.html
[author_name] => Unknown
[author_email] => noreply@blogger.com
[thr] => Array
(
[total] => 0
)
)
[7] => Array
(
[id] => tag:blogger.com,1999:blog-1629366684026287385.post-5274024679884380969
[published] => 2021-06-12T17:57:00.002+07:00
[updated] => 2021-06-12T17:57:19.758+07:00
[title] => Chocolate Pecan Pie
[atom_content] => A slice of this Chocolate Pecan Pie is the perfect festive addition to any Southern celebration! A thick, gooey chocolate chip cookie meets a warm buttery pie for a heavenly and decadent easy dessert recipe.
- 1 frozen (9-inch) deep-dish pie crust thawed
- 1 � sticks (12 tablespoons) salted butter, at room temperature
- ? cup flour
- 1 � cups sugar
- 3 large eggs, beaten
- 1 � cups chopped pecans or walnuts
- 1 � tablespoons bourbon or vanilla extract
- 1 � cups chocolate chips
- Optional: whipped cream or vanilla ice cream, for serving
Preheat oven to 275 degrees F. Place pie crust in a deep pie plate.
Place
room-temperature butter, flour, and sugar in a large mixing bowl. Use
an electric mixer to beat until well blended. Add eggs and combine.
Stir
in nuts, bourbon (or vanilla), and chocolate chips. Pour into pie shell
(make sure to leave a little bit of room at the top of the crust so
that the pie filling doesn't overflow in the oven). If you have too much
filling to fit in your crust, leave some of it out. I haven't had this
issue, but I know that a couple of readers have mentioned that.
Bake
for 90 minutes (or longer, as necessary). See the notes below about how
to know when your pie is done. Allow to cool completely before cutting.
[link_replies] => https://concernrecipes.blogspot.com/feeds/5274024679884380969/comments/defaulthttps://concernrecipes.blogspot.com/2021/06/chocolate-pecan-pie.html#comment-form
[link_edit] => https://www.blogger.com/feeds/1629366684026287385/posts/default/5274024679884380969
[link_self] => https://www.blogger.com/feeds/1629366684026287385/posts/default/5274024679884380969
[link] => https://concernrecipes.blogspot.com/2021/06/chocolate-pecan-pie.html
[author_name] => Unknown
[author_email] => noreply@blogger.com
[thr] => Array
(
[total] => 0
)
)
[8] => Array
(
[id] => tag:blogger.com,1999:blog-1629366684026287385.post-3941341807518675368
[published] => 2021-06-02T17:38:00.003+07:00
[updated] => 2021-06-02T17:38:44.829+07:00
[title] => Ultimate Fudgy Brownies
[atom_content] => Ultimate Brownies are ultra thick, fudgy, chewy, and chocolaty with a crackled crust on top. It took over 6 batches to get this recipe JUST right!
Ingredients
- 1 cup (170 grams) semisweet chocolate chips
- 4 ounces (113 grams) high quality unsweetened chocolate, chopped
- 1 1/2 sticks (170 grams) unsalted butter, cut into pieces
- 3 large eggs plus 1 egg yolk
- 1 1/2 cups (300 grams) granulated sugar
- 1 teaspoon vanilla extract
- 3/4 cup (94 grams) all-purpose flour
- 1/4 teaspoon fine sea salt
Directions
Preheat the oven to 350�F. Line an 8x8-inch metal baking pan with foil or parchment and spray with nonstick cooking spray. Do NOT use glass or ceramic baking pans for this recipe, they will not allow the brownies to cook through the center.
In a large microwave-safe bowl, combine the chocolate chips, unsweetened chocolate, and butter. Microwave for 1 minute, then stir. Continue heating in 30-second bursts, stirring between each burst, until the mixture is melted and smooth but not scorched. Remove from the microwave and let cool slightly.
In a large bowl, use an electric mixer to beat the eggs, egg yolk, and sugar on medium-high speed until light and thick and ribbony, about 3 to 5 minutes or more depending on your mixer. Beat in the vanilla extract.
Using a rubber spatula, gently stir in the cooled chocolate butter mixture. Gently fold in the flour and salt until combined.
Pour the batter into the prepared baking pan. Bake until a tester comes out with moist crumbs still attached, about 35 to 40 minutes. Do not overbake the brownies as they will continue to bake once they?re out of the oven.
Let cool completely to room temperature before slicing. Serve at room temperature or chilled for an even fudgier texture.

[link_replies] => https://concernrecipes.blogspot.com/feeds/3941341807518675368/comments/defaulthttps://concernrecipes.blogspot.com/2021/06/ultimate-fudgy-brownies.html#comment-form
[link_edit] => https://www.blogger.com/feeds/1629366684026287385/posts/default/3941341807518675368
[link_self] => https://www.blogger.com/feeds/1629366684026287385/posts/default/3941341807518675368
[link] => https://concernrecipes.blogspot.com/2021/06/ultimate-fudgy-brownies.html
[author_name] => Unknown
[author_email] => noreply@blogger.com
[thr] => Array
(
[total] => 0
)
)
[9] => Array
(
[id] => tag:blogger.com,1999:blog-1629366684026287385.post-4036752618073357221
[published] => 2021-05-31T01:32:00.002+07:00
[updated] => 2021-05-31T01:32:56.984+07:00
[title] => Best Chocolate Ever
[atom_content] => This Best Chocolate Cake recipe makes for the most flavorful, moist, and tender chocolate cake you've ever tasted! Everyone LOVES it and you don't even need a mixer to make the batter.
Ingredients
For the cake:
- 8 ounces (227 grams) bittersweet chocolate, finely chopped
- 2/3 cup (57 grams) Dutch-process cocoa, sifted
- 2 teaspoons instant espresso powder*
- 1 cup boiling water
- 1 3/4 (222 grams) cups all-purpose flour
- 1 cup (200 grams) granulated sugar
- 1/2 cup (100 grams) packed light brown sugar
- 1 teaspoon salt
- 1 teaspoon baking soda
- 1 cup (227 grams) sour cream, at room temperature
- 1/2 cup vegetable oil*
- 4 large eggs plus one egg yolk, at room temperature
- 1 tablespoon white vinegar
- 2 teaspoons vanilla extract
For the frosting:
- 2/3 cup (133 grams) granulated sugar
- 4 large egg whites
- 1/4 teaspoon salt
- 3 sticks (340 grams) unsalted butter, cut into 12 pieces and at room temperature
- 12 ounces (340 grams) semisweet chocolate, melted and cooled slightly
- 1 teaspoon vanilla extract
Directions
Make the cake:
- In a medium heatproof bowl add the chocolate, cocoa powder, and espresso powder. Pour hot water over mixture. Cover and let stand for 5 minutes. Whisk mixture gently until smooth then set aside to cool.
- Meanwhile, preheat the oven to 350�F. Butter and flour two 8-inch round cake pans.
- In a small bowl, whisk together the flour, sugars, salt, and baking soda.
- Whisk sour cream, oil, eggs, egg yolk, vinegar, and vanilla into the cooled chocolate mixture until smooth. Stir in the flour mixture until smooth, being careful not to overmix. Batter will be thin.
- Pour the batter into the prepared pans and bake for 35 to 40 minutes, or until a cake tester comes out clean. Cool in the pans for 30 minutes, then carefully turn them out onto a cooling rack to cool completely.
Make the frosting:
- Combine the sugar, egg whites, and salt in the bowl of a stand mixer. Set bowl over a saucepan filled with 1-inch of gently simmering water. Whisking gently and constantly, heat mixture until sugar is dissolved and mixture is slightly thickened and foamy and registers 150�F on a candy thermometer or a digital thermometer, about 3 minutes.
- Fit stand mixer with whisk attachment and beat the egg white mixture on medium speed until slightly cooled and thickened, about 2 minutes. Add the butter, 1 piece at a time, until smooth and creamy. If the mixture looks curdled, that?s okay. Just keep beating until it becomes smooth. If the butter becomes too warm and greasy, refrigerate the bowl for 10 to 15 minutes then continue to beat until smooth.
- Add chocolate and vanilla and mix until combined. Increase speed to medium-high and beat until light, fluffy, and well combined, about 30 seconds, scraping down the sides of the bowl as necessary.
Assemble:
- Place one cake layer on a cake turntable or cake stand. Spread an even layer of frosting all of the cake layer, pushing it out over the edge just slightly. Place the other cake layer upside-down on top of the frosting so that the top of the cake is nice and flat. With an offset spatula, spread the remaining frosting evenly all over the cake, smoothing the edges. Serve or cover and store in the fridge for up to 2 days. Let come to room temperature for an hour before serving.
[link_replies] => https://concernrecipes.blogspot.com/feeds/4036752618073357221/comments/defaulthttps://concernrecipes.blogspot.com/2021/05/best-chocolate-ever.html#comment-form
[link_edit] => https://www.blogger.com/feeds/1629366684026287385/posts/default/4036752618073357221
[link_self] => https://www.blogger.com/feeds/1629366684026287385/posts/default/4036752618073357221
[link] => https://concernrecipes.blogspot.com/2021/05/best-chocolate-ever.html
[author_name] => Unknown
[author_email] => noreply@blogger.com
[thr] => Array
(
[total] => 0
)
)
[10] => Array
(
[id] => tag:blogger.com,1999:blog-1629366684026287385.post-7325526494449869865
[published] => 2021-05-01T11:13:00.002+07:00
[updated] => 2021-05-01T11:13:40.082+07:00
[title] => Salted Caramel Chocolate Cake
[atom_content] => 
This Salted Caramel Chocolate Cake is moist and sinfully decadent! So if you love chocolate and caramel, you?ll LOVE this easy recipe for how to make Chocolate Caramel Cake!

Ingredients
For the chocolate cake:
- 2 cups granulated sugar
- 1 cup light brown sugar, packed
- 2 and 3/4 cups all-purpose flour (not packed!)
- 1 and 1/2 cups unsweetened cocoa powder, sifted
- 3 teaspoons baking soda
- 1 and 1/2 teaspoons baking powder
- 1 and 1/4 teaspoons salt
- 3 large eggs + 2 large egg yolks, at room temperature
- 1 and 1/2 cups full-fat sour cream
- 1/3 cup whole milk
- 3/4 cup vegetable oil (you may also sub in melted coconut oil)
- 2 tablespoons vanilla extract
- 1 and 1/2 cups hot water

For the salted caramel chocolate frosting:
- 2 cups unsalted butter (4 sticks, 16 ounces), VERY soft
- 4 and 1/2 cups confectioners' sugar, sifted
- 3/4 cup unsweetened cocoa powder, sifted
- 1 teaspoon vanilla extract
- 1/2 teaspoon salt
- 3 tablespoons heavy cream (more if needed)
- 2 tablespoons salted caramel sauce
Garnish:
- 1 and 1/4 cups salted caramel sauce
- Flaky sea salt

Instructions
For the chocolate cake:
- Preheat oven to 350�(F). Cut out three 9-inch round segments of parchment paper to line your cake pans with. Spray each pan generously - sides and bottom - with nonstick cooking spray, then place the parchment paper cut out in the bottom of the pans and spray again. It's important to make sure every bit of pan and paper are sprayed so your cakes don't get stuck. Set pans aside.
- In the bowl of a stand mixer fitted with the paddle attachment, or in a large bowl using a handheld electric mixer, combine both sugars, flour, cocoa powder, baking soda, baking powder and salt; mix on low until dry ingredients are thoroughly combined. Use your hands to break up any large clumps, if needed.
- In a separate bowl combine the eggs, egg yolks, sour cream, milk, oil and vanilla extract; mix until completely combined. Pour mixture into the dry ingredients and beat on low until just incorporated. Pour in hot water and continue mixing until completely combined; about 1 minute. The batter will quite thin.
- Divide batter evenly among prepared pans. Bake in preheated oven for 30 minutes, or until a wooden toothpick or cake tester inserted in the center of a cake comes out clean or with just a few moist crumbs attached. Cool cakes for 10 minutes in the pan before removing from pans and transferring to a cooling rack; cool cakes completely before frosting.

For the chocolate frosting:
- In a stand mixer fitted with the paddle attachment, cream the softened butter on medium-speed until completely smooth; about 3 minutes.
- Turn the mixer off and sift the powdered sugar and cocoa into the mixing bowl. Turn the mixer on the lowest speed and mix until the sugar/cocoa have been absorbed by the butter; about 2 minutes. Increase mixer speed to medium; add in vanilla extract, salt, heavy cream and salted caramel; beat for 3 minutes. If your frosting appears a little too thin, add a little more confectioners' sugar; If your frosting needs to be thinner, add additional heavy cream, 1 tablespoon at a time.
Assembly:
- Using a serrated knife, carefully trim the raised top of each cake, making each one an even, level surface. Transfer 1 layer to a large plate or cake stand. Spread a thin layer of frosting on top, then add a 1/2 cup of caramel; top with another cake layer, and repeat, thinly spread it with a layer of frosting, then adding a 1/2 cup of caramel. Top final cake layer and place cake in the fridge to set for 1 hour. Once set, finishing frosting the top and sides of the cake. Sprinkle with sea salt. Slice and serve, or keep refrigerated for up to 5 days.
source: https://bakerbynature.com/salted-caramel-chocolate-cake/
[link_replies] => https://concernrecipes.blogspot.com/feeds/7325526494449869865/comments/defaulthttps://concernrecipes.blogspot.com/2021/05/salted-caramel-chocolate-cake.html#comment-form
[link_edit] => https://www.blogger.com/feeds/1629366684026287385/posts/default/7325526494449869865
[link_self] => https://www.blogger.com/feeds/1629366684026287385/posts/default/7325526494449869865
[link] => https://concernrecipes.blogspot.com/2021/05/salted-caramel-chocolate-cake.html
[author_name] => Unknown
[author_email] => noreply@blogger.com
[thr] => Array
(
[total] => 0
)
)
[11] => Array
(
[id] => tag:blogger.com,1999:blog-1629366684026287385.post-3578815375141939244
[published] => 2021-04-30T20:02:00.002+07:00
[updated] => 2021-04-30T20:04:56.403+07:00
[title] => Lemon Cream Tart (Low Carb & Keto)
[atom_content] => 
A creamy lemon curd tart bursting with tartness and flakey buttery almond pastry crust. This dessert is low carb, sugar-free, gluten-free and keto-friendly.

Ingredients
Almond Crust
- 2 cups almond flour
- 3 Tbsp coconut flour
- 4 Tbsp unsalted melted butter
- 1 large egg
- 4 Tbsp powdered erythritol

Lemon Tart Filling
- 4 large eggs
- 4 large egg yolks
- 1 cup of lemon juice (fresh)
- 1/4 cup heavy cream
- 1 cup of butter cubed
- 1 1/4 cups powdered erythritol (test your lemons if they are very tart, add more sweetener)

Instructions
Almond Tart Crust
- Preheat oven to 350F
- Blend almond flour, coconut flour, powdered erythritol, and melted butter in a food processor.
- Add 1 egg and blend until the mixture starts to pull away from the side of the food processor bowl.
- You may need to add a Tbsp of water, depending on the dryness of your almond flour. If the mixture is not coming together, add the water.
- Form the tart crust into a disc and place it in the fridge for about 30 minutes. This makes it easier to handle.
- Roll out the dough between two sheets of parchment paper, adding a touch more almond flour if it starts to stick.
- Spread the tart dough out in your tart pan ( 9 inch round, 8-inch square, or 4.5x 14 rectangle) making sure to press into the side of the pan, and cover any holes that form while you're pressing. This takes a bit of patience, just keep pressing and spreading until your tart crust is spread evenly with no breaks.
- Pierce the crust with a fork and bake for 10-12 minutes until golden. Keep an eye out because almond flour tends to darken very quickly.
- Let the crust cool.

Lemon Filling
- Pour an inch of water into the bottom of a medium-sized saucepan and heat to a low simmer.
- Add eggs, egg yolks, lemon juice, powdered erythritol, and heavy cream into a separate heat-safe bowl.
- Place the bowl over the pot of simmering water and cook until the mixture coats the back of a spoon. This can take up to 15 minutes. Use a whisk and stir constantly while cooking to avoid burning.
- Once the mixture thickens, add the butter in cubes one at a time and whisk until fully melted.
- Add the filling to the cooled tart crust.
- Cool the dessert to room temperature.
source: https://sugarfreesprinkles.com/lemon-cream-tart-low-carb-keto/
[link_replies] => https://concernrecipes.blogspot.com/feeds/3578815375141939244/comments/defaulthttps://concernrecipes.blogspot.com/2021/04/lemon-cream-tart-low-carb-keto.html#comment-form
[link_edit] => https://www.blogger.com/feeds/1629366684026287385/posts/default/3578815375141939244
[link_self] => https://www.blogger.com/feeds/1629366684026287385/posts/default/3578815375141939244
[link] => https://concernrecipes.blogspot.com/2021/04/lemon-cream-tart-low-carb-keto.html
[author_name] => Unknown
[author_email] => noreply@blogger.com
[thr] => Array
(
[total] => 0
)
)
[12] => Array
(
[id] => tag:blogger.com,1999:blog-1629366684026287385.post-9166121175032708098
[published] => 2021-04-30T16:48:00.003+07:00
[updated] => 2021-04-30T16:58:41.467+07:00
[title] => Chocolate Salted Caramel Tart
[atom_content] => This chocolate caramel tart is absolutely amazing. A buttery almond crust, gooey salted caramel and bittersweet chocolate ganache, all garnished with salted crystals. Chocolaty, rich and buttery, I fell in love with it from the first bite. Love the salt crystals as they don't melt immediately and let your taste buds experience the sweet, the salty and the bitter in the same time.

Ingredients
- Makes about 6-8 servings
- Almond Chocolate Sweet Pastry
- 1 1/4 cups (160g) flour
- 1/4 cup (30g) ground almonds
- 1/4 cup (30g) unsweetened cocoa powder
- 1/4 cup (50g) sugar
- 1/4 tsp salt
- 1 stick (110 g) cold unsalted butter, cut into small (1/2-inch) cubes
- 1 tsp vanilla extract
- 1 egg
- 1-2 tbsp ice water
- Caramel
- 1 1/2 cups (300 g) sugar
- 1/2 cup water
- 1/2 cup (120 g) heavy cream
- 5 tbsp (70 g) unsalted butter
- 1 tsp salt
- Chocolate Ganache
- 1/2 cup (120 g) heavy cream
- 4 oz (120g) bittersweet chocolate, chopped
- Garnish
- sea salt crystals
Directions
- Prepare the sweet pastry. In a large bowl mix flour with ground almonds, cocoa powder, sugar and salt.
- Incorporate butter to the flour mixture, using a pastry blender, a fork or a pastry processor, until crumbs are formed. Add the egg and vanilla extract and mix them in. Add water and incorporate into the dough. Wrap it with plastic, knead slowly to form a disc and refrigerate for at least 30 minutes or overnight.
- On o floured surface or over the plastic wrap roll the dough to a circle with about 1 1/2 inches larger than your tart pan. Lift up the rolled dough and place it on a greased 9 inch tart pan. Remove the edges and refrigerate for 30 minutes before baking.
- Prick the dough with a fork, line a parchment paper over the dough. Fill with dry beans, rice or pie weights.
- Bake for 15 minutes in preheated 350 F (180C) oven. Remove the weights and the parchment paper. Return to oven for another 10 to 15 minutes. Allow to cool before removing from the tart pan.
- Prepare the caramel. Place the sugar and water in a medium heavy bottomed saucepan over medium-high heat, and cook without stirring until sugar dissolves and gets a caramel color.
- Remove the pan from the heat and add the cream. It will bubble a little bit.
- Cook for about 1 or 2 minutes stirring constantly with a wooden spoon until smooth. Remove from heat and add butter and salt. Stir well until smooth.
- Let the caramel cool slightly and pour over the chocolate crust. Refrigerate for about 4-5 hours.
- Prepare the chocolate ganache. Heat the cream in a small saucepan. When the cream just begins to boil at the edges, remove from heat and pour over the chopped chocolate. Let sit one minute, then stir until smooth.
- Pour the chocolate ganache over the caramel. Spread it evenly and refrigerate for another 2-3 hours before serving. Sprinkle with sea salt flakes and serve.
source: https://www.homecookingadventure.com/recipes/chocolate-salted-caramel-tart
[link_replies] => https://concernrecipes.blogspot.com/feeds/9166121175032708098/comments/defaulthttps://concernrecipes.blogspot.com/2021/04/chocolate-salted-caramel-tart.html#comment-form
[link_edit] => https://www.blogger.com/feeds/1629366684026287385/posts/default/9166121175032708098
[link_self] => https://www.blogger.com/feeds/1629366684026287385/posts/default/9166121175032708098
[link] => https://concernrecipes.blogspot.com/2021/04/chocolate-salted-caramel-tart.html
[author_name] => Unknown
[author_email] => noreply@blogger.com
[thr] => Array
(
[total] => 0
)
)
[13] => Array
(
[id] => tag:blogger.com,1999:blog-1629366684026287385.post-1205970734485568538
[published] => 2021-04-29T12:28:00.003+07:00
[updated] => 2021-04-29T12:28:24.587+07:00
[title] => No-Bake Cherry Yum Yum
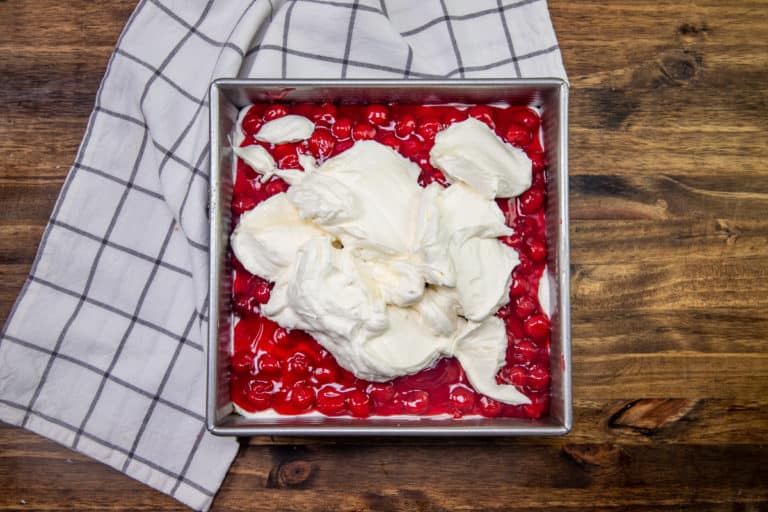
[atom_content] => 
No-Bake Cherry Yum Yum is a layered dessert of sweetened graham cracker crumbs, cream cheese, cherry pie filling and fresh whipped cream!

Ingredients
- 1 � cups graham cracker crumbs
- 6 tbsp salted butter, melted
- 1 (8 oz) block cream cheese, softened to room temp.
- � cup sugar
- 2 cups (1 pint) heavy whipping cream
- 3 tbsp sugar
- � tsp. vanilla extract
- 1 (21 oz) can cherry pie filling
Instructions
- Start by crushing the graham crackers into crumbs. I put about 10 graham cracker sheets into a ziploc bag then pounded them with a heavy object (like a rolling pin or flat meat tenderizer). You need enough to make 1 � cups in crumbs.
- In a medium bowl, combine melted butter with graham cracker crumbs.
- Set aside 2 tbsp. of the crumbs (we'll use that for the topping.)
- Spread the rest of the crumbs into a 9x9 baking dish. Push down with your hands to make a flat layer.
- Next, combine softened cream cheese with � cup sugar. This is easiest if you use a stand mixer or a handheld electric mixer. Set this bowl aside.
- In a separate bowl (to make the whipped cream), combine the heavy whipping cream, 3 tbsp. sugar and vanilla extract. Using a stand or electric mixer, whip it until stiff peaks form. You can skip this if you are using COOL WHIP. This will take a minute or two on a high speed setting.
- Combine the cream cheese mixture with the whipped cream, by hand, until combined well.
- Spread half of the cream cheese/whipped cream mixture evenly over crust.
- Evenly spread the cherry pie filling over the whipped cream layer. Finally, top with the remaining cream cheese/whipped cream mixture. Spread evenly. Top with reserved graham cracker crumbs.
- Refrigerate for a couple hours (or overnight) before slicing and serving.
source: https://www.thecountrycook.net/no-bake-cherry-yum-yum/
[link_replies] => https://concernrecipes.blogspot.com/feeds/1205970734485568538/comments/defaulthttps://concernrecipes.blogspot.com/2021/04/no-bake-cherry-yum-yum.html#comment-form
[link_edit] => https://www.blogger.com/feeds/1629366684026287385/posts/default/1205970734485568538
[link_self] => https://www.blogger.com/feeds/1629366684026287385/posts/default/1205970734485568538
[link] => https://concernrecipes.blogspot.com/2021/04/no-bake-cherry-yum-yum.html
[author_name] => Unknown
[author_email] => noreply@blogger.com
[thr] => Array
(
[total] => 0
)
)
[14] => Array
(
[id] => tag:blogger.com,1999:blog-1629366684026287385.post-2860009203782458735
[published] => 2021-04-28T15:40:00.003+07:00
[updated] => 2021-04-28T15:40:36.092+07:00
[title] => Orange Ice Cream
[atom_content] => This award-winning Orange Ice Cream recipe is made with fresh squeezed orange juice and makes the most delicious treat on a hot summer's day.

Ingredients
- 2 � cups fresh squeezed orange juice (6-8 oranges)
- 1 1/2 Tablespoons lemon juice (or substitute)
- 3/4 cup granulated sugar (or more if needed, if oranges are not overly sweet)
- 2 cups heavy cream
- 1 Tablespoon orange Jello*
Instructions
- Add orange juice, lemon juice and sugar to a mixing bowl and stir well to combine. Taste and add a little more sugar if it?s not sweet enough. Whisk in cream and orange Jello.
- Freeze/churn according to ice cream maker instructions. *If using a modern electric ice cream maker (that doesn?t require ice/salt) freeze the bowl of the ice cream maker overnight and refrigerate the liquid mixture for several hours (or overnight), before churning. Both need to be completely chilled.
- Store in the freezer for 1-2 weeks, in an airtight container with a piece if plastic wrap against the surface to help keep it from crystalizing.
source: https://tastesbetterfromscratch.com/orange-ice-cream/
[link_replies] => https://concernrecipes.blogspot.com/feeds/2860009203782458735/comments/defaulthttps://concernrecipes.blogspot.com/2021/04/orange-ice-cream.html#comment-form
[link_edit] => https://www.blogger.com/feeds/1629366684026287385/posts/default/2860009203782458735
[link_self] => https://www.blogger.com/feeds/1629366684026287385/posts/default/2860009203782458735
[link] => https://concernrecipes.blogspot.com/2021/04/orange-ice-cream.html
[author_name] => Unknown
[author_email] => noreply@blogger.com
[thr] => Array
(
[total] => 1
)
)
[15] => Array
(
[id] => tag:blogger.com,1999:blog-1629366684026287385.post-6501480545059747296
[published] => 2021-04-28T15:02:00.000+07:00
[updated] => 2021-04-28T15:02:10.718+07:00
[title] => Homemade Mallo Cups Recipe
[atom_content] => 
Then there are mallo cups. They are in a whole other league for me, almost a little sugary delicacy because I only ever got them once a year at Halloween. What is ridiculous because I?m pretty positive that they are or were ?manufactured? (oh that just sounds delicious) only an hour or two away from where we live. They just happened to be that certain candy that I nearly forgot about every single year until I spied one in my pillowcase dressed in my full out Jem costume.

Ingredients
- 12 ounces milk chocolate
- 2 tablespoons coconut oil
- 1 cup marshmallow fluff
- 1/3 cup unsweetened, flaked coconut
homemade marshmallow fluff
- 2 large egg whites
- 1/4 teaspoon cream of tartar
- 2/3 cup light corn syrup
- 1/2 cup granulated sugar
- 1/4 cup water
- 1/2 teaspoon vanilla extract
- pinch of salt

Instructions
- Line a standard size muffin tin with muffin liners. Chop the flaked coconut into small pieces.
- Melt the chocolate over a double boiler or in the microwave (if you use the microwave, do it in 30 second increments then stir to prevent burning). Once the chocolate has just melted, stir in the coconut oil until it has melted. Spoon about 1 ? 1 1/2 tablespoons of chocolate into the bottom of the muffin liners and use a spoon or pastry brush to bring the chocolate up over the sides. Sprinkle the chocolate with a teaspoon or so of the coconut. Use as much as you want! You can?t go wrong here. Stick the chocolate in the fridge or the freezer for 20 minutes, just so it sets up and becomes firm.
- Spoon about 1 1/2 tablespoons of the marshmallow fluff into the chocolate cups. Sprinkle the remaining coconut over the top of the fluff. Put the muffin tin back in the fridge or freeze so the marshmallow firms up, another 20 minutes or so.
- If the remaining melted chocolate has started to firm up, re-melt it. Spoon it over top of the cups and smooth it out. Place the tin back in the fridge or freezer for another 20 minutes before serving. I love keeping these cold ? otherwise they can be a bit messy.
homemade marshmallow fluff
- Add the egg whites and cream of tartar to the bowl of your electric mixer. Using the whisk attachment, beat until the egg whites are frothy. Add the corn syrup, sugar and water to a small saucepan over medium heat until the mixture boils. Let boil for about 5 minutes, stirring occasionally until the sugar reaches a temperature of 240degrees F on a candy thermometer.
- With the mixer on medium speed, gently pour the hot syrup into the egg white mixture. Add the vanilla extract and the salt, then increase the mixer speed to high and beat until stiff peaks form, about 5 minutes. Store the fluff in the fridge.
source: https://www.howsweeteats.com/2013/10/easy-homemade-mallo-cups/
[link_replies] => https://concernrecipes.blogspot.com/feeds/6501480545059747296/comments/defaulthttps://concernrecipes.blogspot.com/2021/04/homemade-mallo-cups-recipe.html#comment-form
[link_edit] => https://www.blogger.com/feeds/1629366684026287385/posts/default/6501480545059747296
[link_self] => https://www.blogger.com/feeds/1629366684026287385/posts/default/6501480545059747296
[link] => https://concernrecipes.blogspot.com/2021/04/homemade-mallo-cups-recipe.html
[author_name] => Unknown
[author_email] => noreply@blogger.com
[thr] => Array
(
[total] => 0
)
)
[16] => Array
(
[id] => tag:blogger.com,1999:blog-1629366684026287385.post-8198337224224823894
[published] => 2021-04-26T03:54:00.004+07:00
[updated] => 2021-04-26T03:56:14.739+07:00
[title] => German Chocolate Pie
[atom_content] => 
Thanksgiving dinner at our house includes an average of 25 guests and a dozen different pies. This one has all the luscious flavor of German chocolate cake. A friend who tried it told me he wanted it to be his birthday pie from now on.?Debbie Clay, Farmington, New Mexico

Ingredients
- Dough for single-crust pie
- FILLING:
- 4 ounces German sweet chocolate, chopped
- 1 tablespoon butter
- 1 teaspoon vanilla extract
- 1/3 cup sugar
- 3 tablespoons cornstarch
- 1-1/2 cups whole milk
- 2 large egg yolks
- TOPPING:
- 2/3 cup evaporated milk
- 1/2 cup sugar
- 1/4 cup butter, cubed
- 1 large egg, lightly beaten
- 1-1/3 cups sweetened shredded coconut, toasted
- 1/2 cup chopped pecans, toasted

Directions
- Preheat oven to 400�. On a lightly floured surface, roll dough to a 1/8-in.-thick circle; transfer to a 9-in. pie plate. Trim crust to 1/2 in. beyond rim of plate; flute edge.
- Line unpricked pastry with a double thickness of foil. Fill with pie weights, dried beans or uncooked rice. Bake 25 minutes. Remove foil and weights; bake until golden brown, 4-6 minutes longer. Cool on a wire rack.
- For filling, in a microwave, melt chocolate and butter; stir until smooth. Stir in vanilla. In a small heavy saucepan, mix sugar and cornstarch. Whisk in whole milk. Cook and stir over medium heat until thickened and bubbly. Reduce heat to low; cook and stir 2 minutes longer. Remove from heat.
- In a small bowl, whisk a small amount of hot mixture into egg yolks; return all to pan, whisking constantly. Bring to a gentle boil; cook and stir 2 minutes. Remove from heat. Stir in chocolate mixture. Pour into crust.
- For topping, in a small saucepan, combine evaporated milk, sugar and butter. Cook and stir until butter is melted and mixture just comes to a boil. Remove from heat.
- In a small bowl, whisk a small amount of hot mixture into egg; return all to pan, whisking constantly. Bring to a gentle boil; cook and stir 2 minutes. Remove from heat. Stir in coconut and pecans. Pour over filling.
- Cool pie 30 minutes on a wire rack. Refrigerate, covered, until cold, at least 3 hours.
source: https://www.tasteofhome.com/recipes/contest-winning-german-chocolate-pie/
[link_replies] => https://concernrecipes.blogspot.com/feeds/8198337224224823894/comments/defaulthttps://concernrecipes.blogspot.com/2021/04/german-chocolate-pie.html#comment-form
[link_edit] => https://www.blogger.com/feeds/1629366684026287385/posts/default/8198337224224823894
[link_self] => https://www.blogger.com/feeds/1629366684026287385/posts/default/8198337224224823894
[link] => https://concernrecipes.blogspot.com/2021/04/german-chocolate-pie.html
[author_name] => Unknown
[author_email] => noreply@blogger.com
[thr] => Array
(
[total] => 0
)
)
[17] => Array
(
[id] => tag:blogger.com,1999:blog-1629366684026287385.post-3977846049276318598
[published] => 2021-04-25T18:52:00.003+07:00
[updated] => 2021-04-25T19:05:41.518+07:00
[title] => Ooey-Gooey Cinnamon Buns
[atom_content] => 
These buns are sooo good hot from the oven when they're gooey and warm.
Ingredients

- 1 teaspoon white sugar
- 1 (.25 ounce) package active dry yeast
- � cup warm water (110 degrees F/45 degrees C)
- � cup milk
- � cup white sugar
- � cup butter
- 1 teaspoon salt
- 2 eggs, beaten
- 4 cups all-purpose flour
- � cup butter
- � cup brown sugar
- 1 cup chopped pecans, divided
- � cup brown sugar
- 1 tablespoon ground cinnamon
- � cup melted butter

Directions
Step 1
In a small bowl, dissolve 1 teaspoon sugar and yeast in warm water. Let stand until creamy, about 10 minutes. Warm the milk in a small saucepan until it bubbles, then remove from heat. Mix in 1/4 cup sugar, 1/4 cup butter and salt; stir until melted. Let cool until lukewarm.
Step 2
In a large bowl, combine the yeast mixture, milk mixture, eggs and 1 1/2 cup flour; stir well to combine. Stir in the remaining flour, 1/2 cup at a time, beating well after each addition. When the dough has pulled together, turn it out onto a lightly floured surface and knead until smooth and elastic, about 8 minutes.

Step 3
Lightly oil a large bowl, place the dough in the bowl and turn to coat with oil. Cover with a damp cloth and let rise in a warm place until doubled in volume, about 1 hour.
Step 4
While dough is rising, melt 3/4 cup butter in a small saucepan over medium heat. Stir in 3/4 cup brown sugar, whisking until smooth. Pour into greased 9x13 inch baking pan. Sprinkle bottom of pan with 1/2 cup pecans; set aside. Melt remaining butter; set aside. Combine remaining 3/4 cup brown sugar, 1/2 cup pecans, and cinnamon; set aside.
Step 5
Turn dough out onto a lightly floured surface, roll into an 18x14 inch rectangle. Brush with 2 tablespoons melted butter, leaving 1/2 inch border uncovered; sprinkle with brown sugar cinnamon mixture. Starting at long side, tightly roll up, pinching seam to seal. Brush with remaining 2 tablespoons butter. With serrated knife, cut into 15 pieces; place cut side down, in prepared pan. Cover and let rise for 1 hour or until doubled in volume. Meanwhile, preheat oven to 375 degrees F (190 degrees C).

Step 6
Bake in preheated oven for 25 to 30 minutes, until golden brown. Let cool in pan for 3 minutes, then invert onto serving platter. Scrape remaining filling from the pan onto the rolls.
[link_replies] => https://concernrecipes.blogspot.com/feeds/3977846049276318598/comments/defaulthttps://concernrecipes.blogspot.com/2021/04/ooey-gooey-cinnamon-buns.html#comment-form
[link_edit] => https://www.blogger.com/feeds/1629366684026287385/posts/default/3977846049276318598
[link_self] => https://www.blogger.com/feeds/1629366684026287385/posts/default/3977846049276318598
[link] => https://concernrecipes.blogspot.com/2021/04/ooey-gooey-cinnamon-buns.html
[author_name] => Unknown
[author_email] => noreply@blogger.com
[thr] => Array
(
[total] => 0
)
)
[18] => Array
(
[id] => tag:blogger.com,1999:blog-1629366684026287385.post-8864187416033450909
[published] => 2021-04-25T09:55:00.005+07:00
[updated] => 2021-04-25T09:55:59.684+07:00
[title] => Chocolate Oreo Pie
[atom_content] => 

Chocolate Oreo Pie is an easy no bake dessert recipe perfect for when you don't feel like turning on the oven. This decadent pie is made with chocolate instant pudding mix and loaded with Dark Chocolate Oreo cookies.

Ingredients
Filling
- 3.9 oz instant chocolate pudding mix
- 1 cup milk
- 10 Dark Chocolate Oreo cookies
- 1 cup semi sweet chocolate chips
- 1 cup Cool Whip
- 1 Oreo pie crust
Topping
- 1 cup Cool Whip
- 1/2 tbsp cocoa powder
- 5 Dark Chocolate Oreo cookies


Ingredients
- Dump pudding mix and milk into a large mixing bowl.
- Mix with electric mixer until pudding is nice and thick.
- Place Oreo cookies in a large Ziploc bag and crush with a heavy bottomed pot.
- Pour the crushed Oreos into a mixing bowl.
- Place the chocolate chips in a microwave safe bowl and microwave on high for one minute. Stir well.
- If the chocolate chips are not completely melted microwave for another thirty seconds and stir again. Repeat until completely melted.

- Pour melted chocolate into the mixing bowl.
- Use electric mixer to combine melted chocolate and crumbled Oreos with the pudding mixture.
- Add Cool Whip to the mixing bowl and use a rubber spatula to fold it into the pudding mixture.
- Dump the mixture into the Oreo pie crust and spread it out evenly.
- For the topping, scoop the Cool Whip and cocoa powder into a small mixing bowl. Stir well.
- Spread the chocolate Cool Whip on top of the pie filling.
- Crush the Oreos and sprinkle them on top.
- Place the pie in the refrigerator and chill for at least two hours before slicing and serving.
source: https://www.thisisnotdietfood.com/chocolate-oreo-pie/
[link_replies] => https://concernrecipes.blogspot.com/feeds/8864187416033450909/comments/defaulthttps://concernrecipes.blogspot.com/2021/04/chocolate-oreo-pie.html#comment-form
[link_edit] => https://www.blogger.com/feeds/1629366684026287385/posts/default/8864187416033450909
[link_self] => https://www.blogger.com/feeds/1629366684026287385/posts/default/8864187416033450909
[link] => https://concernrecipes.blogspot.com/2021/04/chocolate-oreo-pie.html
[author_name] => Unknown
[author_email] => noreply@blogger.com
[thr] => Array
(
[total] => 0
)
)
[19] => Array
(
[id] => tag:blogger.com,1999:blog-1629366684026287385.post-7320522015633458830
[published] => 2021-04-24T20:44:00.002+07:00
[updated] => 2021-04-24T20:45:06.580+07:00
[title] => Keto Chocolate Roll Cake
[atom_content] => 
Keto Chocolate Roll Cake is an easy and simple recipe for any or special occasion. This roll cake is completely to die for!

Ingredients
Chocolate Roll Cake:
1 cup Almond Flour
4 tbsp. Butter, melted
3 large Eggs
1/4 cup Psyllium Husk Powder
1/4 cup Cocoa Powder
1/4 cup Coconut Milk
1/4 cup Sour Cream
1/4 cup Erythritol
1 tsp. Vanilla Extract
1 tsp. Baking Powder

Cream Cheese Filling:
8 oz. Cream Cheese
8 tbsp. Butter
1/4 cup Sour Cream
1/4 cup Erythritol
1/4 tsp. Liquid Stevia
1 tsp. Vanilla Extract

Directions
- Measure out the dry ingredients into a bowl: Almond Flour, Psyllium Husk Powder, Cocoa Powder, Erythritol, and Baking Powder.
- Melt butter in the microwave, then add sour cream, butter, and eggs to the dry ingredients. Use a hand mixer to mix this together.
- Add coconut milk to the batter to make it so that it?s more workable and spreadable.
- Spread the batter over a Baking Liners. It should cover the area of an entire cookie sheet.
- Bake for 12-15 minutes at 350F.
- Let cool slightly and start to work on the cream cheese filling.
- In a bowl, combine Cream Cheese, Butter, Sour Cream, Erythritol, Liquid Stevia, and Vanilla. Use a hand mixer to cream together until fully incorporated.
- Plop the cream cheese filling on top of the cake and spread evenly with a spoon.
- Roll the cake up gently. Use a knife to scrape off any excess filling to get a clean seam on the edge of the roll.
- Serve up with a cup of coffee for breakfast, or with some whipped cream for dessert!
- Enjoy!
source: https://recommended.tips/keto-chocolate-roll-cake/
[link_replies] => https://concernrecipes.blogspot.com/feeds/7320522015633458830/comments/defaulthttps://concernrecipes.blogspot.com/2021/04/keto-chocolate-roll-cake.html#comment-form
[link_edit] => https://www.blogger.com/feeds/1629366684026287385/posts/default/7320522015633458830
[link_self] => https://www.blogger.com/feeds/1629366684026287385/posts/default/7320522015633458830
[link] => https://concernrecipes.blogspot.com/2021/04/keto-chocolate-roll-cake.html
[author_name] => Unknown
[author_email] => noreply@blogger.com
[thr] => Array
(
[total] => 0
)
)
[20] => Array
(
[id] => tag:blogger.com,1999:blog-1629366684026287385.post-166401829368620687
[published] => 2021-04-24T18:24:00.005+07:00
[updated] => 2021-04-24T18:24:29.474+07:00
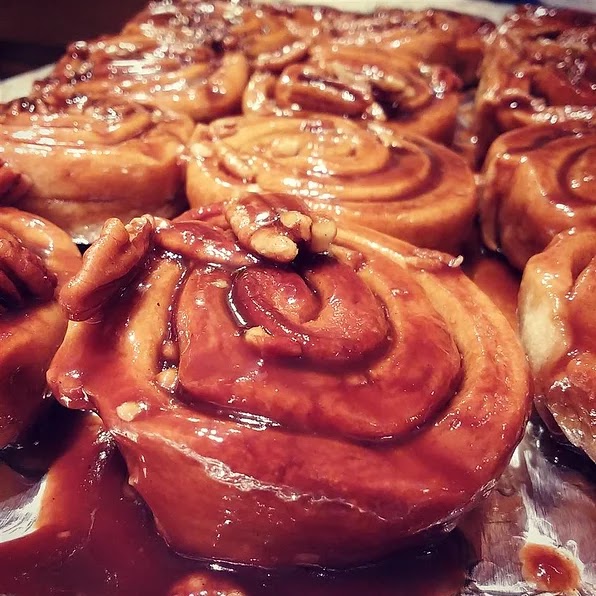
[title] => Cinnabon Caramel Pecanbons
[atom_content] => 
Caramel Pecanbons:
Dough recipe for Cinnabon Cinnamon Rolls
3 cups brown sugar
3 tablespoons flour
3 tablespoons Korintje cinnamon
1 cup melted unsalted butter, divided

Icing:
1 1/2 cup confectioners' sugar
2 1/2 tablespoons butter or margarine, melted
1 teaspoon vanilla extract
3-4 tablespoons lemon juice

Caramel Pecan Glaze:
2 tablespoons unsalted butter
1/2 cup brown sugar
1 cup heavy cream
2 teaspoons vanilla extract
pinch of salt
1 cup toasted pecans, chopped

Cinnabon Cinnamon Caramel Pecanbons: Complete the dough recipe for the Cinnabon Cinnamon Rolls.
In a small bowl, combine the sugar, cinnamon, and flour to make the cinnamon roll filling. Split the dough into two and then shape each piece into an 8 x 14 inch rectangle. Brush 1/4 cup of the melted butter and sprinkle 1 cup of the cinnamon filling on each dough rectangle.
Roll each piece of dough up using the long ends until it resembles a jellyroll. Brush each roll with 1/8 cup of the remaining butter and sprinkle with the 1/8 cup of remaining cinnamon/sugar mixture. Slice each dough roll into 6 pieces.

Spread the remaining butter over a large baking sheet with edges. Sprinkle the remaining cinnamon and sugar mixture over the butter. Place the dough slices close together in the pan. Allow the dough to rise for another 30 to 45 minutes. Preheat an oven to 350. Bake for 25 to 30 minutes or until browned. Allow to cool before applying icing or caramel pecan glaze.
Pecanbon Icing: In a small bowl, mix the confectioners' sugar, melted butter, and lemon juice.
Set aside.
Caramel Pecan Glaze: In a saucepan combine the brown sugar, half and half, vanilla, and salt.
Heat on medium heat while stirring constantly for about 10 minutes. Remove caramel glaze from heat and stir in pecans. Spread the icing and then the caramel pecan glaze over the warm cinnabon rolls. Serves 12.
[link_replies] => https://concernrecipes.blogspot.com/feeds/166401829368620687/comments/defaulthttps://concernrecipes.blogspot.com/2021/04/cinnabon-caramel-pecanbons.html#comment-form
[link_edit] => https://www.blogger.com/feeds/1629366684026287385/posts/default/166401829368620687
[link_self] => https://www.blogger.com/feeds/1629366684026287385/posts/default/166401829368620687
[link] => https://concernrecipes.blogspot.com/2021/04/cinnabon-caramel-pecanbons.html
[author_name] => Unknown
[author_email] => noreply@blogger.com
[thr] => Array
(
[total] => 0
)
)
[21] => Array
(
[id] => tag:blogger.com,1999:blog-1629366684026287385.post-8254870231774637714
[published] => 2021-04-23T00:10:00.001+07:00
[updated] => 2021-04-23T00:10:32.506+07:00
[title] => Salted Caramel Butter Bars
[atom_content] => 
Buttery, soft crumb bars filled with salted caramel! I dare you to stop at one bite.. it's irresistible!

Ingredients
- 2 cups 4 sticks unsalted butter, softened
- 1 cup white sugar
- 1 & 1/2 cups powdered sugar
- 1 Tbsp vanilla extract
- 4 cups all-purpose flour
- 1 11.5 oz jar salted caramel sauce (I like Smuckers Brand Simple Delights, but Trader Joe's Fleur de Sel is great, too!)
- Sea salt

Instructions
- Preheat oven to 325 degrees F. Line a 13x9" baking pan with foil, extending the sides of the foil over the edges of the pan. Spray the foil liberally with cooking spray and set aside.
- In the bowl of a stand mixer fitted with the paddle attachment, beat together the butter and sugar until creamy and fluffy, about 2 minutes. Beat in the powdered sugar and vanilla. Lastly, beat in the four (4) cups of flour until a soft dough has formed. Press HALF of the dough evenly into the bottom of the prepared pan. Refrigerate the remaining dough.
- Bake the crust for 15 minutes. Remove from the oven but keep the oven on. Pour the caramel evenly into the crust, then crumble the remaining dough on top to cover the caramel layer. Sprinkle lightly with sea salt, and remember that there's salt in the caramel sauce, too ?
- Return to the oven and continue baking for an additional 25-30 minutes or until golden brown and the caramel is bubbly. If the middle jiggles a little bit, this is okay - it will continue to cook as it cools. Cool completely, then refrigerate for at least an hour before cutting into squares.

source: https://thedomesticrebel.com/2014/11/13/salted-caramel-butter-bars/
[link_replies] => https://concernrecipes.blogspot.com/feeds/8254870231774637714/comments/defaulthttps://concernrecipes.blogspot.com/2021/04/salted-caramel-butter-bars.html#comment-form
[link_edit] => https://www.blogger.com/feeds/1629366684026287385/posts/default/8254870231774637714
[link_self] => https://www.blogger.com/feeds/1629366684026287385/posts/default/8254870231774637714
[link] => https://concernrecipes.blogspot.com/2021/04/salted-caramel-butter-bars.html
[author_name] => Unknown
[author_email] => noreply@blogger.com
[thr] => Array
(
[total] => 0
)
)
[22] => Array
(
[id] => tag:blogger.com,1999:blog-1629366684026287385.post-3444409498094707417
[published] => 2021-04-22T12:03:00.003+07:00
[updated] => 2021-04-22T12:03:23.565+07:00
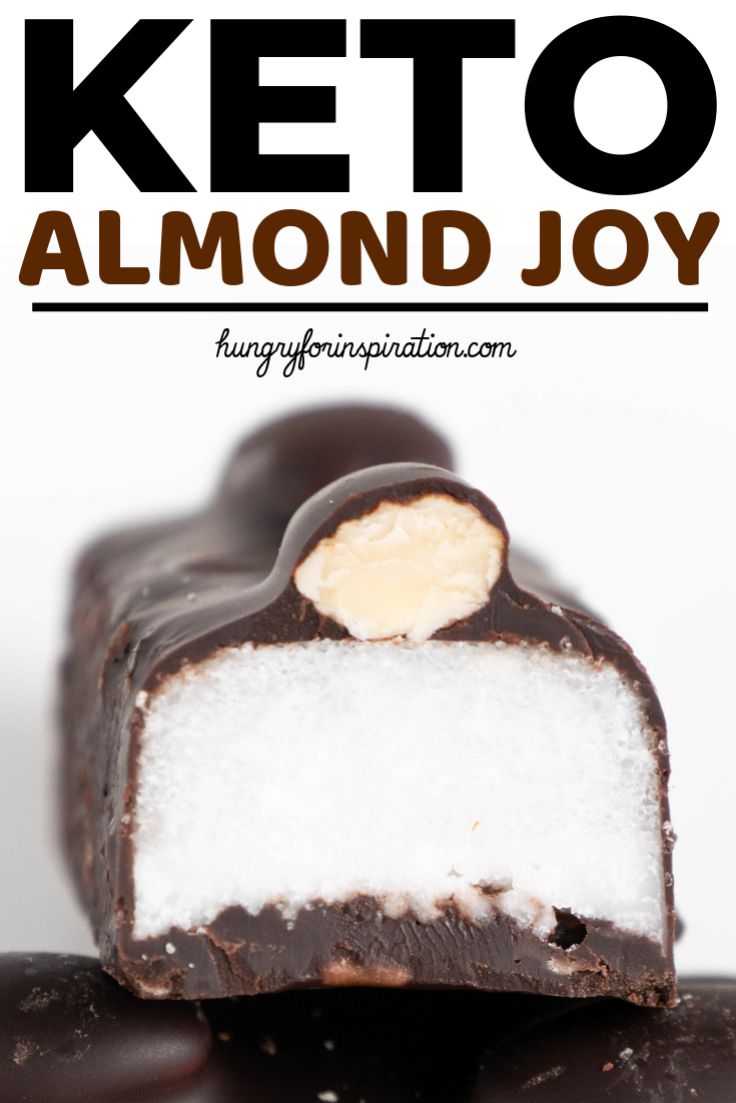
[title] => Homemade Keto Almond Joy Bars (Fat Bombs)
[atom_content] => 
These delicious Homemade Keto Almond Joy Bars are filled with healthy fats from coconut oil while only adding 3.5g net carbs to your carb count!

Ingredients
- 5 tbsp (1oz/30g) shredded coconut
- 6 tbsp (3fl.oz/90ml) coconut oil
- 4 tbsp (1.8oz/52g) granulated erythritol
- 3 oz (3oz/90g) (approx.) sugar-free chocolate or chocolate with at least 85% cacoa content
- 8 small almonds (unsalted)


Instructions
- Melt the coconut oil & mix with the shredded coconut & erythritol.
- Fill the liquid mixture into a suitable silicone mold.
- Chill in your fridge until solid (takes about 30 minutes).
- Melt the chocolate using a double boiler while the coconut filling is chilling in the fridge.
- Add approx. 2-3 tsp of the melted chocolate on top of the coconut filling while it's still in the silicone mold. This will be the "bottom" of our Almond Joy bars.
- Chill again until the chocolate is solid, takes about 15-20 minutes.
- Reheat the chocolate if necessary.
- Place the now completely solid coconut filling with the chocolate bottom on a baking rack with parchment paper underneath it.
- Place two small almonds on every bar & pour the melted chocolate over the coconut bars and chill them again until the chocolate is solid.
- Serve cold with a cup of tea or coffee!
- Cover with plastic wrap and store in your fridge for at least 1-2 weeks.

source: https://hungryforinspiration.com/keto-almond-joy/
[link_replies] => https://concernrecipes.blogspot.com/feeds/3444409498094707417/comments/defaulthttps://concernrecipes.blogspot.com/2021/04/homemade-keto-almond-joy-bars-fat-bombs.html#comment-form
[link_edit] => https://www.blogger.com/feeds/1629366684026287385/posts/default/3444409498094707417
[link_self] => https://www.blogger.com/feeds/1629366684026287385/posts/default/3444409498094707417
[link] => https://concernrecipes.blogspot.com/2021/04/homemade-keto-almond-joy-bars-fat-bombs.html
[author_name] => Unknown
[author_email] => noreply@blogger.com
[thr] => Array
(
[total] => 0
)
)
[23] => Array
(
[id] => tag:blogger.com,1999:blog-1629366684026287385.post-6843134627526413904
[published] => 2021-04-22T11:45:00.000+07:00
[updated] => 2021-04-22T11:45:09.406+07:00
[title] => Low Carb Coconut Fat Bombs
[atom_content] => Our low carb coconut keto fat bombs are loaded with coconut flavor. These slightly sweetened bombs only have 1 net carb per serving which means that you can have more than one and tame your sugar craving with their silky smooth flavor!

Ingredients
- 2 Cups Unsweetened Shredded Coconut
- 1/3 Cup Coconut Oil
- 2 Tsp Lakanto Granulated Sweetener
- 1/2 Tsp Pure Vanilla Extract
Instructions
- Add shredded coconut, coconut oil, Lakanto Granulated Sweetener and vanilla extract to a blender and mix until mixture is fine and crumbled. (By the way you can get 15% off your Lakanto Granulated Sweetener when you use the code: KetoCoach)
- Line a non-stick baking sheet with wax paper and using a small cookie scoop, scoop the mixture and form into small mounds. Then place in the freezer for 10 minutes to set. Enjoy!
source: https://ketocoachforwomen.com/low-carb-coconut-keto-fat-bombs/
[link_replies] => https://concernrecipes.blogspot.com/feeds/6843134627526413904/comments/defaulthttps://concernrecipes.blogspot.com/2021/04/low-carb-coconut-fat-bombs.html#comment-form
[link_edit] => https://www.blogger.com/feeds/1629366684026287385/posts/default/6843134627526413904
[link_self] => https://www.blogger.com/feeds/1629366684026287385/posts/default/6843134627526413904
[link] => https://concernrecipes.blogspot.com/2021/04/low-carb-coconut-fat-bombs.html
[author_name] => Unknown
[author_email] => noreply@blogger.com
[thr] => Array
(
[total] => 0
)
)
[24] => Array
(
[id] => tag:blogger.com,1999:blog-1629366684026287385.post-5514880828776505323
[published] => 2021-04-22T11:18:00.002+07:00
[updated] => 2021-04-22T11:19:44.356+07:00
[title] => Triple Layer Cracker Toffee Bars
[atom_content] => 
These easy caramel & chocolate triple layer cracker toffee bars are a fun twist to traditional cracker toffee. One pan, three layers, and only about 10 minutes is all you need for sweet, buttery, salty perfection. It's a must make Christmas recipe!

Ingredients
- 1 box (13.7 oz) Club Crackers
- 1 can (14 oz) sweetened condensed milk
- 1 cup packed brown sugar
- 1/2 cup (1 stick) salted butter
- 1/4 cup milk
- 1 bag (12 oz) milk chocolate chips (about 2 cups)


Instructions
- Line a 9x13 baking dish with tin foil. Spray the bottom and the sides of the tin foil with cooking spray.
- Place Club crackers in the bottom of the pan so it's covering the tin foil in a layer. You will probably have to break some in order to get the first layer down.
- In a saucepan, over medium heat, combine the sweetened condensed milk, brown sugar, butter, and milk. Stir and let the butter melt. Once butter is melted, turn heart to medium-high and let it cook for 5 minutes, while stirring constantly. It will boil which is what you want.
- Pour 1/3 of the caramel mixture over the layer of crackers and spread out evenly. Repeat this two more times, ending with the caramel layer on top.
- Pour the bag of milk chocolate chips into a microwave-safe bowl and microwave for 2 minutes, stirring every 30 seconds, until the chocolate is melted and smooth. Pour over the top caramel layer and evenly spread out. If wanted, sprinkle some Christmas sprinkles or toffee pieces on top.
- Refrigerate for 2 hours. Lift the bars out of the pan by the overhang of the tin foil and cut into small squares. As the bars sit out at room temperature they will soften slightly. Store leftovers covered in the fridge.

source: https://togetherasfamily.com/triple-layer-cracker-toffee-bars/
[link_replies] => https://concernrecipes.blogspot.com/feeds/5514880828776505323/comments/defaulthttps://concernrecipes.blogspot.com/2021/04/triple-layer-cracker-toffee-bars.html#comment-form
[link_edit] => https://www.blogger.com/feeds/1629366684026287385/posts/default/5514880828776505323
[link_self] => https://www.blogger.com/feeds/1629366684026287385/posts/default/5514880828776505323
[link] => https://concernrecipes.blogspot.com/2021/04/triple-layer-cracker-toffee-bars.html
[author_name] => Unknown
[author_email] => noreply@blogger.com
[thr] => Array
(
[total] => 0
)
)
)
[channel] => Array
(
[id] => tag:blogger.com,1999:blog-1629366684026287385
[updated] => 2024-08-29T01:10:16.387+07:00
[title] => Concern Recipes
[subtitle] => Most easy delicious tasty recipes
[link_http://schemas.google.com/g/2005#feed] => https://concernrecipes.blogspot.com/feeds/posts/default
[link_self] => https://www.blogger.com/feeds/1629366684026287385/posts/default?redirect=false
[link] => https://concernrecipes.blogspot.com/
[link_hub] => http://pubsubhubbub.appspot.com/
[link_next] => https://www.blogger.com/feeds/1629366684026287385/posts/default?start-index=26&max-results=25&redirect=false
[author_name] => Seterpi Jaga
[author_uri] => http://www.blogger.com/profile/12741728170978624115
[author_email] => noreply@blogger.com
[generator] => Blogger
[opensearch] => Array
(
[totalresults] => 255
[startindex] => 1
[itemsperpage] => 25
)
)
[textinput] => Array
(
)
[image] => Array
(
)
[feed_type] => Atom
[feed_version] =>
[encoding] => ISO-8859-1
[_source_encoding] =>
[ERROR] =>
[WARNING] =>
[_CONTENT_CONSTRUCTS] => Array
(
[0] => content
[1] => summary
[2] => info
[3] => title
[4] => tagline
[5] => copyright
)
[_KNOWN_ENCODINGS] => Array
(
[0] => UTF-8
[1] => US-ASCII
[2] => ISO-8859-1
)
[stack] => Array
(
)
[inchannel] =>
[initem] =>
[incontent] =>
[intextinput] =>
[inimage] =>
[current_namespace] =>
[last_modified] => Sat, 21 Sep 2024 12:34:37 GMT
)